It's an alien that latches onto your head and sucks out your brain power or something (so I'm told). In the game, Samus (a super Bad-A** chick in a heavy duty space suit) goes in search of the other alien race that is using metroids to harvest brain power from people. It's a really cool game, I'm playing through it now and he's helping me along. So I figured what better way for us to celebrate his birthday together than to share a metroid cupcake?! I looked around online and I found a few tasty looking treats, but none that really popped out at me. Lots of cupcakes use cute metroid topper decorations, or clever frosting art, but I really wanted a cupcake that actually looked like a metroid.
 Since it's just going to be the two of us tonight (his big party is this weekend, and I'm making a whole different cake for that!), I decided to use a single serving cupcake recipe so we wouldn't have way more than we
 Super Metroid Cupcakes for 2
based on Sweet Road's single serving vanilla cupcake (the recipe below is doubled)
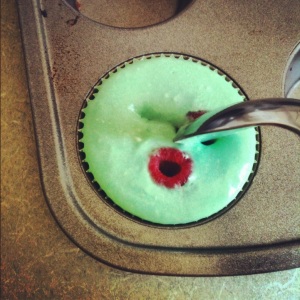
Things you'll need:Preheat oven to 350°F. In a medium bowl, combine the margarine and stevia until creamed. Add 4 tbsp of the almond milk and stir to combine. In a separate bowl, sift together the flour, baking powder, and salt. Carefully fold the flour mixture into the margarine mixture until just combined. Fold in the remaining milk and vanilla and mix until incorporated (do not over mix, that will make the cupcakes tough and icky). Add about 6 drops of green food coloring to the batter and mix gently. Divide the batter between 2 - 3 cupcake liners in a cupcake tin. Carefully place 3 - 4 fresh raspberries onto the top of each cupcake, pushing them down into the batter with a spoon. These will be the red thingies inside the metroid, and it will look so cool when they're done. Bake for 15 - 20 minutes (mine were perfect after 17 minutes). Allow finished cupcakes to cool in the pan for 5 minutes before removing to a wire rack. Cool completely before decorating.
- 1 tbsp margarine softened
- 4 tbsp sugar ( I used 6 packets of Stevia Raw)
- 9 tbsp almond milk (room temperature)
- 1/2 tsp vanilla
- 7 tbsp cake flour
- 1/2 tsp baking powder
- a dash of salt
- about 6 drops of green food coloring
- 8 - 10 cleaned fresh raspberries
- white candy melts
- white frosting (I used canned whipped cream frosting)
- 2 mixing bowls
- heat proof glass bowl (like Pyrex)
- small sauce pan or pot
- baking sheet
- wax paper
- metroid fangs template (download my template here, or create you own)
- cupcake paper cups (I happened to have the perfect shade of green in my pantry, but I think white would work well, too)
While you are waiting for the cupcakes to bake, begin making the head grabber fang things with candy melts (I'm sorry I don't know the specific terms for metroid anatomy). Put the fangs template on the baking sheet and place the wax paper over it, set aside.
Construct a double boiler: fill the pot with just enough water so that the water does not touch the bottom of the Pyrex bowl when it is place on top of the pot. Set the pot on to low-medium heat, just to get some steam going (you don't really want the water to boil). Put a small handful of candy melts into the Pyrex bowl. You can get candy melts at any bake or craft shop, and a little goes a long way, so start with just a few at once. Use a spoon to continuously stir the candy melts in the bowl, to make sure the heat is evenly distributed among them and the melt uniformly. Continue stirring as they melt until perfectly smooth, then remove the Pyrex bowl from the pot and place on a trivet.
Using a butter knife, pick up small amounts of the melted candy (about 1/8 to 1/4 a teaspoon) and gently drop it onto the wax paper over the template. Use the knife to spread out the candy into the shape of a fang using the template as a guide. As you work, you can move the template under the wax paper to make several fangs. I made lots more than I needed, just in case some broke or some looked better than others (the last ones I made were the best ones). When you are finished, place the baking sheet with the wax paper into the freezer and keep them frozen until right before you use them.
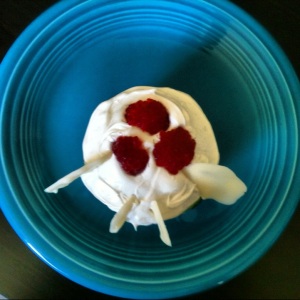
Now is the fun part: decorating! Working one cupcake at a time, spoon a small amount (1 - 2 tsp) of white frosting onto each cupcake. Don't over frost, there's already a lot going on with these babies. Smooth out the frosting to cover the whole top. Cut 2 fresh raspberries in half and place 2 - 3 halves on top of the frosting, bumpy side out. Get your candy fangs and pop them off the wax paper (they should come easy). Arrange two large fangs and two small fangs on the cupcake.
And BAM, you got a metroid cupcake. Accept the praise of others as the best girlfriend in the world. Happy Birthday, Caleb <3


No comments:
Post a Comment